TMUX - terminal multiplexing
https://leanpub.com/the-tao-of-tmux/read
TMUX is a "window manager" for the terminal.
It is extremely useful to manage working sessions, especially on remote servers
advantages
- allow to have multiple terminal opens, with rich split screen
- sessions persists between connections (can hold long running programs like a jupyter kernel)
- allow for multiuser collaboration
the design - 1
whenever you launch tmux it creates a session to which you can connect (attach) and disconnect (detach).
The manager will keep running until you explicitely kill it.
you can have multiple tmux sessions running at the same time.
I usually start a new tmux session for every project that I start.
There are also several ways to configure tmux to have pre-configured sessions (tmuxinator, tmux-resurrect, etc...)
All the controls given to tmux will be provided using a leader key.
By default is set to Ctrl-b, but you can change it by editing the ~/.tmux.conf file with:
set -g prefix C-Space
I prefere using Ctrl-space or Ctrl-a (when CAPSLOCK is remapped to Ctrl)
after using the leader one can provide another keybinding for a command or type : and spell it out
at any point you can use leader-? to see all keybinding or leader-:list-commands to see all the available commands (goes back to the session pressing q or Return)
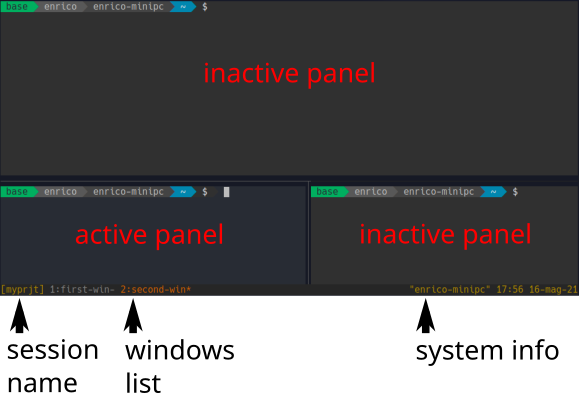
session management - the basics
sessions contains your project, such as system administration or development of a program
tmux new -s <sessionname>to create and attach to a new session with the provided name- (from inside)
leader-dorleader-:detachto detach from the session tmux lsto list all the active sessionstmux attach -t <sessionname>to reconnect to a running session
all the shells that you will create during this sessions will start from the root directory from which you created it
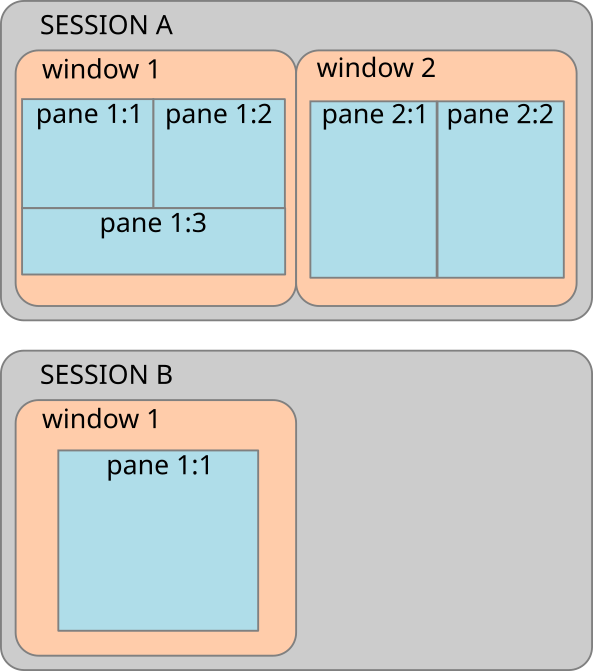
session management - killing a session
- (from inside) close all the terminals one by one (
exitotCtrl-d) - (from inside)
leader-:kill-session tmux kill-session -t <sessionname>
session management - quickly switch session from inside tmux
leader-worleader-:choose-treeto select a specific pane in a session, and goes to the selected one withReturnleader-sorleader-:choose-sessionto simply show all sessions, and goes to the selected one withReturn
session management - renaming a session
leader-$will prompt to change the nameleader-:rename-session <newname>renames the current sessiontmux rename-session -t <targetsession> <newname>
windows management - the basics
windows collect a series of related programs, for example a server and a view of its logs
leader-corleader-:new-windowcreates a new window and goes to itleader-:list-windowsgets a list of all the current windows, and goes to the selected one withReturnleader-,(comma) orleader-:rename-window <newname>renames the current windowleader-&orleader-:kill-windowkill the current windows and all its panes (will ask confirmation)leader-<N>(with N as 0, 1, 2, ...) goes to the windows number Nleader-pandleader-ngoes to the previous and next window in the list
panels management - the basics
panels are where your program lives.
They can be used to split a windows in many ways, and there are a lot of controls to arrange them as you like.
leader-%vertical splitleader-"(double quotes) horizontal splitleader-xkill paneleader-ogo to next pane (likeAlt-Tabfor normal windows)leader-ztoggle full-screen mode for current pane
mouse input
Mouse input is turned off by default, as it can interfere with the terminal management.
to turn it on or off you can use :set mouse on and :set mouse off.
while the mouse is active the copy and paste don't work as usual:
- normal selection from the mouse will drop to copy mode, and will copy the text inside tmux
- if you press
Shiftyou can pass the mouse control to the terminal emulator as normal
if the mouse is turned on you will be able to scroll the history, but it will send you in copy mode by default (see later)
panels management side note - layout management - 1
rearranging the panels can be useful if you are working with a lot of panels per windows (can be useful if you have a big screen) and the sessions persists for long time (for example on a server)
leader-[hjkl]go to next pane in vim-style (hleft,jdown,kup,lright)leader-qshow pane-numbersleader-}swap with the next paneleader-{swap with the previousleabder-:swap-pane -s 3 -t 1swap pane1with pane3leader-[←→↑↓]resize the paneleader-!(exclamation mark) break the pane out of the window into a new one
panels management side note - layout management - 2
leader-Ctrl-orotate window ‘up’ (i.e. move all panes)leader-Alt-orotate window ‘down’leader-Alt-1switch to even-horizontal layoutleader-Alt-2switch to even-vertical layoutleader-Alt-3switch to main-horizontal layoutleader-Alt-4switch to main-vertical layoutleader-Alt-5switch to tiled layoutleader-spaceswitch to the next layout
copy mode
tmux is designed to allow you to work completely mouseless, so it includes a powerful copy mode to allow you to copy and paste text from the output of the command line programs.
the workflow of copy mode is the following:
leader-[to start the copy- move around and copy the text you are interested about. while you are moving around you don't need the
leaderkey leader-]to paste the text where you need it
the only limitation is that the copied text is only available inside tmux
there are ways to move that text to the host system clipboard, but it's fidgety. On a remote servers it's even worse.
my suggestion? just use a mouse to extract that text
copying the text
in copy mode you can move the cursor around in various ways. The simplest one is using the arrow keys.
Once you press Space it will start selecting the text.
Now when you move the cursors it will select the text.
If you like the result, presso Enter to copy, or Esc to stop the selection and go back to the cursor movement.
to exit without copying you can also press q
moving the cursor
tmux uses a mix of vi and readline keybinding.
the best way to see them all is to use :list-keys, but some very simple ones, aside of the arrow keys:
egoes to the end of the current wordbgoes back to the beginning of the current wordvselect the whole line3egoes to the end of third word from here3bgoes back to the beginning of third word from here5jto 5 lines down5kto 5 lines up0to the start of the line$to the end of the line
pair programming
tmux allow you to have two users access the same sessions, windows and so on.
It can be done in many ways, depending on what you need.
I suggest reading this explanation for more details if you are interested
https://www.hamvocke.com/blog/remote-pair-programming-with-tmux/
tmux scripting
tmux allows complete control from simple bash scripts.
This can be used to automatize it without the need for any external tool any external tool
a basic script would look something like:
# Start new detached session called "work"
tmux new -d -s work
# rename the current selected window
# in the "work" session as "terminal"
tmux rename-window -t work terminal
# attach to the session "work"
tmux attach -t work
this is the script I use when working on these lectures
#!/bin/bash
# Session Name
session="SandC"
# avoid changing the session if it already exists
SESSIONEXISTS=$(tmux list-sessions | grep $session)
if [ "$SESSIONEXISTS" = "" ]
then
    # Start new detached session with given name
    tmux new-session -d -s $session
    # rename a window and split in two terminals
    tmux rename-window -t $session terminal
    # create a new window and change the name directly
    tmux new-window -t $session -n "server"
    # start a program in it
    tmux send-keys -t $session 'jupyter notebook' C-m
    # split the window vertically and start another program
    tmux split-window -v -t $session
    tmux send-keys -t $session 'htop' C-m
    # select a specific pane (session:window.pane)
    # needs to select the windows first
    tmux select-window -t $session:terminal
    tmux select-pane -t $session:terminal.2
fi
# attach to the session
tmux attach-session -t $session
you might want to check out tmuxinator for a yaml based configuration.
it works very well, but I prefere a project based script that is located in the project directory rather than using a global list of configurations.
SSH - connecting to a remote server
ssh is the default way to connect to a remote server.
for today's lesson we will use the remote server provided by overthewire.org.
please be good citizens and don't mess around too much in their machine!
once you connect with a machine using ssh it will open a new shell.
this shell will be killed once the connection is closed... and with it all the programs that might be running on it!
if you want to have persistent program, you need to use tmux as we discussed before!
a very common use is to launch a jupyter notebook on a remote server, and use it from your local computer
connecting to a remote server - basic
to connect to a server and open a new shell there, you can write:
ssh <remote username>@<server name or ip> -p <connection port>
for example, the overthewire.org server allows a connection with the username bandit0 (password bandit0)
ssh bandit0@bandit.labs.overthewire.org -p 2220
configuration
ssh is a powerful program and can be configured in many ways; This can lead to hard to write command lines.
To make your life easier you can use the file ~/.ssh/config
in there you can put server specific configuration to simplify your life
Host myserver
    Hostname 127.0.0.1
    User enrico.giampieri
    LocalForward    8883 localhost:8883
    ServerAliveInterval 240
this allow me to simply use ssh myserver
remote command execution
one powerful function of ssh (one of the many) is the ability to send directly commands to the server without having to login to the shell.
this can be done with:
ssh <user>@<server> "arbitrary shell commands"
for example, to read the content of all the txt files in the home of a remote server (for which we can use the short version of the ssh command) we could use:
ssh myserver "ls *.txt | xargs cat"
piping locally
the pipe (|) binds more strongly than the command, so if you want to pipe on the server you have to put the command in the double quotes.
if you want to pipe the result to a local program, you can just pipe it (or redicrect it) as normal.
for example to save the output of the previous command to a local temp file, we could use:
ssh myserver "ls *.txt | xargs cat" > temp
remote command persistency
note that the commands will create a new shell, execute and destroy the shell, so you can't for example change directory with one call and then run something there with the next call.
You can, on the other end, change directory and do somthing in the same call.
in general it is better to just save a script remotely if the command you want to perform is non trivial.
- save the script on the server
- put it in the home directory
- make it executable with
chmod +x myscript - execute with
ssh myserver "./myscript"
streaming local scripts
if you have a simple scripts with some commands, you can also directly send it to the server without actually copying it.
for example, if you have a python script my_script.py you can run it as:
ssh <user>@<server> python < ./my_script.py
port forwarding
port forwarding is an incredible ability of ssh, that allows to run remote server as if they were local to your pc.
the typical use case for us would be to have something like a jupyter kernel running in the server and interacting with it from your local browser.
the command line can be quite a mouthful, so I would suggest to configure it in your ~/.ssh/config
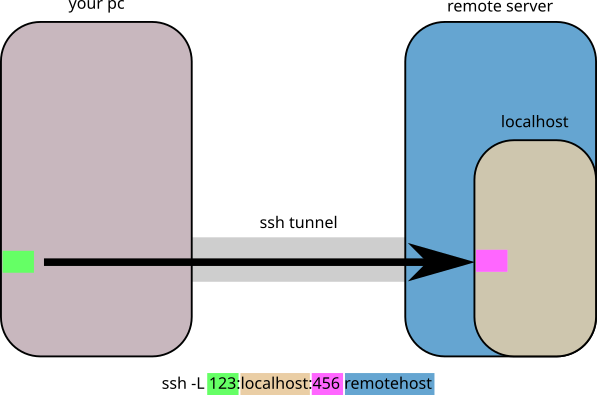
local to remote localhost
in this case your port 123 is connected to the server, and if there is a service that is running on localhost:456 you would be able to see it on your computer at the URL localhost:123
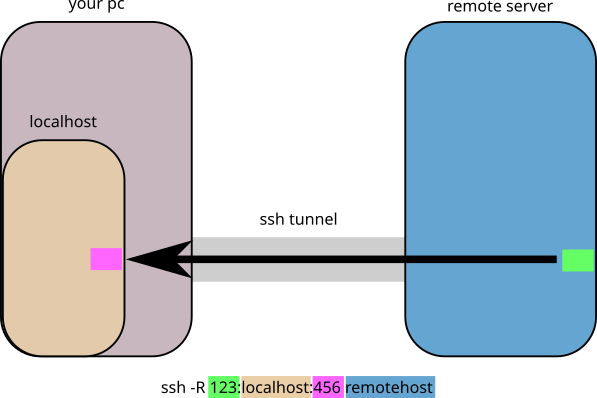
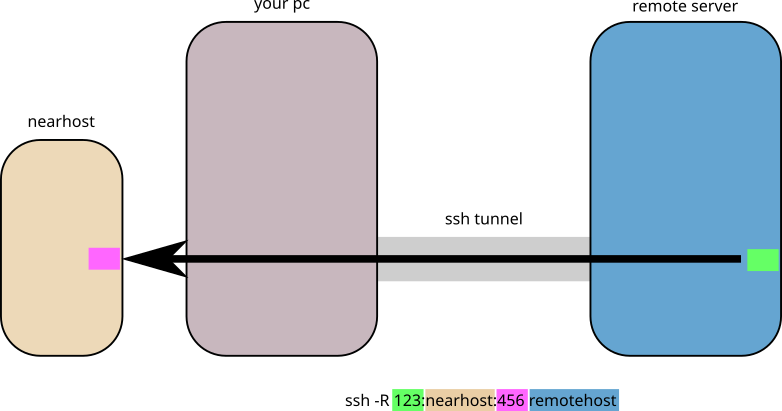
remote port to the localhost of your pc
in this case there is a server running on your machine and you want to have the remote machine connect to it as if it was in their localhost.
it is the same thing as before, but set up from the other side.
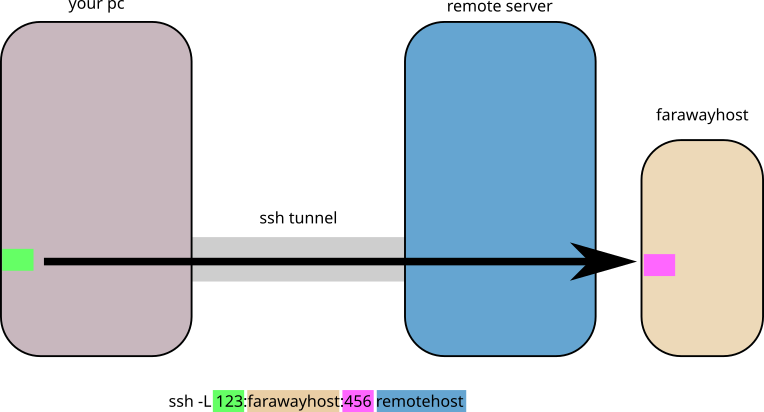
local to a server that can be reached by the remote server
this time the service we want to connect to is not reacheable by our computer directly, but is running somewhere that is accessible by the remote server.
In this case we are basically connecting to the far away server "as if" we were the remote server, and mappping that in our localhost:123 port.
remote port to a server that can be reached by your local pc
as before, this the exact same situation as before, but set up from the other side
access without password
by default ssh asks for the password of your remote user everytime you try to access.. that gets old pretty quickly.
You can easily set it up to allow you to have passwordless login:
ssh-keygen -t rsacreates a pair of cryptographic keys, by default in your.sshfolder. you can use the defaults without any issues. keep these files secure, they allow to access your user without any other control!!ssh-copy-id <username>@<server_ip>to copy the identity on the server.- now you should be able to login without any password being asked to you
scp - secure copy
a common operation you might need is to copy files from and to a server.
to do so, from your computer you can use the scp program.
it works like the cp program, but needs to specify also the server from which to copy.
it relies on ssh, so if it is configured you can use avoid specifying the user and the full address, and to access without having to enter your password everytime.
remote filesystems with sshfs
if you have to constantly edit files on a server one possibility is to create a virtual folder that the linux OS will see as a real one, but in reality is reading and writing directly from the remote server.
First we need to create the local folder where we want to mount the remote directoty
mkdir ./remote_dir
now we just need to tell sshfs to connect the local directory with the remote one.
They will be connected as long as I don't unmount my directory.
sshfs <username>@<server>:<directory absolute path> ./remote_dir
be careful to use the absolute path of the folder, it will not expand the ~ (home character)
once I'm done and I want to disconnect the directory, I can use the unmount command
umount ./remote_dir